Let’s be honest—some days just demand dessert. Maybe it’s the chaos of a long workday, the ever-growing mountain of laundry, or the fact that your toddler just used peanut butter as shampoo. Whatever the reason, this Biscoff Cheesecake is here to save the day—and your sanity.
With its cozy cinnamon-sugar flavor, creamy layers, and a dreamy cookie crust that tastes like a warm hug, this Biscoff Cheesecake isn’t just a dessert—it’s a moment of peace. You know, the kind you sneak in while hiding behind the fridge door with a fork. No judgment here.
This recipe is perfect for busy women juggling all the things—because guess what? It’s surprisingly easy. You don’t need a culinary degree or six hours of free time. Just a few simple ingredients and a craving for something utterly delightful.
Whether you’re hosting friends, treating your family, or just needing a little solo celebration (yes, that counts!), this Biscoff Cheesecake delivers. It’s rich, indulgent, and just the right amount of “fancy” without the stress.
If you’re into creamy desserts with a twist, don’t miss our Matcha Tiramisu — it’s no-bake, light, and luxuriously unique.
So tie on your apron (or don’t), grab a mixing bowl, and let’s turn your kitchen into the coziest bakery on the block. Ready?
Contents
- 1 Why You’ll Love This Biscoff Cheesecake
- 2 Equipment You’ll Need (Nothing Fancy, Promise)
- 3 Let’s Talk Ingredients
- 4 Let’s Make the Biscoff Cheesecake (Step-by-Step Magic)
- 5 Pro Tips from My (Crumb-Filled) Kitchen
- 6 A Little Biscoff Cheesecake Story…
- 7 How to Store Your Biscoff Cheesecake (If There’s Any Left…)
- 8 Nutrition Breakdown: What’s Inside This Slice of Sweetness?
- 9 Let’s Talk Time: How Long Does Biscoff Cheesecake Take?
- 10 Yield & Cuisine
- 11 Frequently Asked Questions About Biscoff Cheesecake
Why You’ll Love This Biscoff Cheesecake
- It’s comfort food with flair – sweet, creamy, and spiced just right.
- Make-ahead friendly – bake it the night before and chill. Zero last-minute scrambling.
- Crowd pleaser – picky eaters? Never heard of ’em.
- Minimal equipment needed – no fancy gadgets, just you and a whisk.
Looking for another irresistible crowd-pleaser? Our Crack Cake might just be your next obsession.
Equipment You’ll Need (Nothing Fancy, Promise)
Before you start, let’s make sure you’ve got the basics. No high-end gadgets here—just trusty kitchen friends that get the job done.
- 9-inch springform pan
- Mixing bowls (a couple will do)
- Hand mixer or stand mixer
- Rubber spatula
- Measuring cups & spoons
- Food processor or a zip-top bag + rolling pin (for those glorious crushed cookies)
- Baking sheet (you’ll use this for a water bath—don’t skip this, it’s cheesecake insurance)
Let’s Talk Ingredients
Alright, it’s time to line up our delicious cast. Every ingredient plays a role in making this Biscoff Cheesecake the dreamy dessert it is.
For the Cookie Crust:
- 1 package (250g) Biscoff cookies – crushed to crumbly perfection
- 1/3 cup (75g) unsalted butter – melted and ready to bind all that cookie magic
For the Biscoff Cheesecake Filling:
- 4 blocks (907g total) cream cheese – softened to dreamy smoothness
- 1 cup (200g) brown sugar – adds warmth and depth
- 1/4 cup (50g) granulated sugar – for that balanced sweetness
- 1/2 cup (120g) sour cream – for a tangy twist and silky texture
- 1 cup (240g) Biscoff cookie butter – the heart of this beauty
- 1 tablespoon vanilla extract – just enough to round it all out
- 1/4 teaspoon salt – because salt in sweets is a quiet hero
- 4 large eggs – room temp, please (they mix better and keep your batter smooth)
To Decorate (Optional but So Worth It):
- 1/2 cup Biscoff spread – gently melted for drizzling
- 1/4 cup Biscoff cookies – crushed into golden, crunchy sprinkles
Let’s Make the Biscoff Cheesecake (Step-by-Step Magic)
Step 1: Preheat and Prepare
First things first—preheat your oven to 325°F (160°C). Place the oven rack in the middle position. Wrap the outside of your springform pan with a couple of layers of heavy-duty foil. This will help keep the water bath from seeping in later. Trust me, no one wants a soggy crust.
Step 2: Make That Buttery Cookie Crust
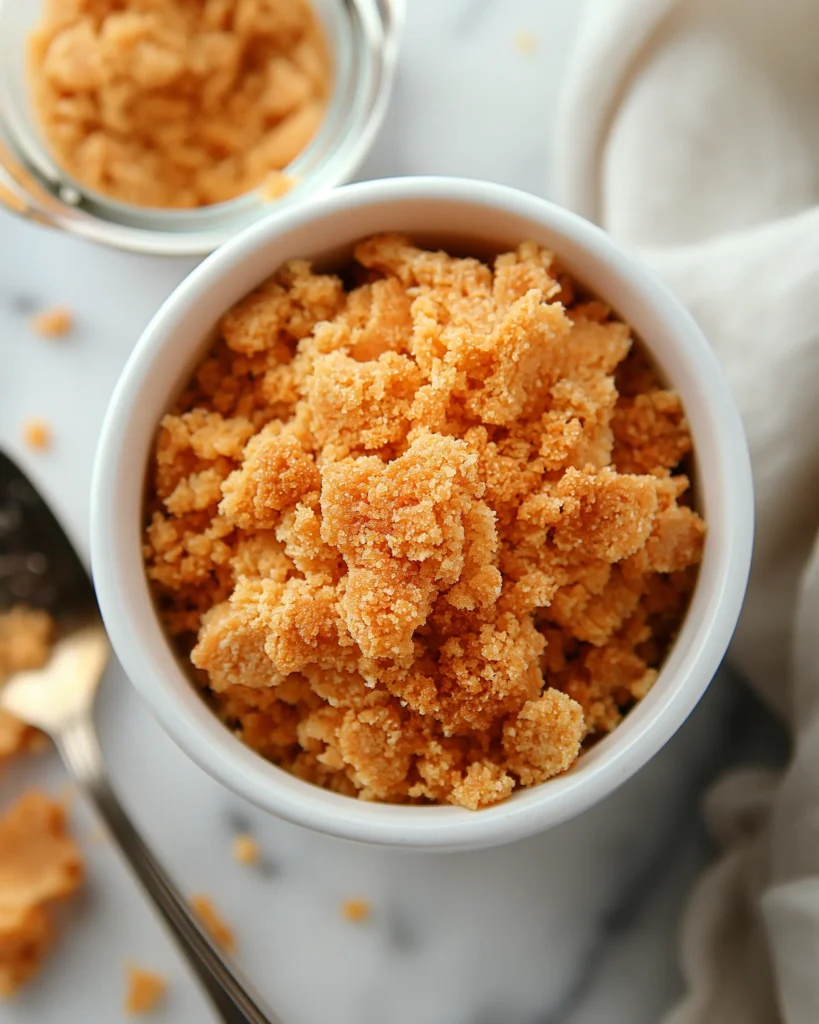
In a food processor (or with a rolling pin and a zip-top bag if you’re feeling rustic), crush your Biscoff cookies until they’re fine crumbs. Transfer to a bowl and stir in the melted butter until the mixture feels like damp sand.
Pour it into your pan and press it down evenly—don’t forget to push up the sides a bit for that full-on cookie hug around your Biscoff Cheesecake. Use the bottom of a glass to help pack it in nice and tight. Bake the crust for 10 minutes, then let it cool while you move on to the star of the show.
Step 3: Whip Up the Dreamy Biscoff Cheesecake Filling
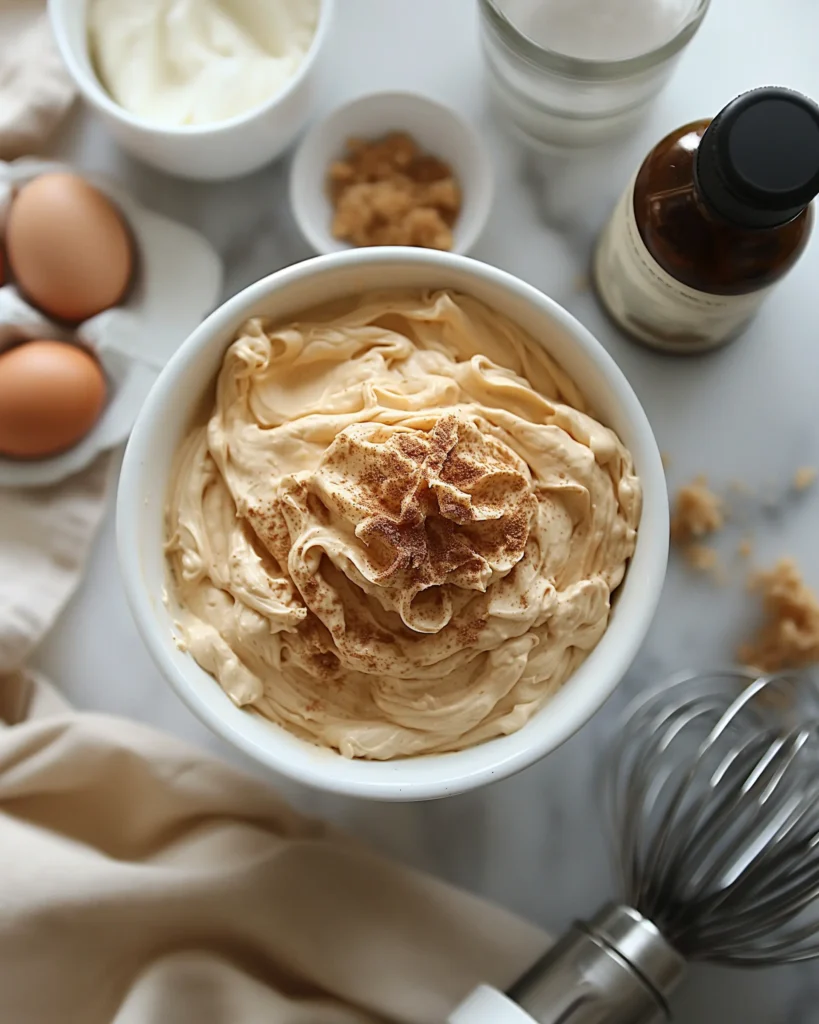
In a large bowl, beat the softened cream cheese until smooth and creamy. No lumps here—we’re aiming for cloud texture. Add the brown sugar and granulated sugar, and beat again until fully combined.
Mix in the sour cream, vanilla extract, and a pinch of salt. Then comes the glorious Biscoff cookie butter—pour it in and mix until everything looks like one big, beautiful batter.
Crack in the eggs, one at a time, mixing on low speed after each addition. Don’t overmix here—just blend until it’s incorporated. Overbeating can cause cracks, and we’re not into cheesecake drama today.
Step 4: Assemble and Bake
Pour that luscious batter over your cooled crust. Smooth the top with a spatula and gently tap the pan on the counter to release any air bubbles.
Place the foil-wrapped springform pan inside a larger baking dish and fill the outer dish with hot water halfway up the sides of your Biscoff Cheesecake pan. This is your water bath—your cheesecake’s cozy sauna. It keeps things creamy and prevents cracking.
Bake for 60 to 70 minutes, until the center is just slightly jiggly. Think: set edges, soft middle.
Step 5: Cool it Down, Chill it Out
Once done, crack the oven door open slightly and let the Biscoff Cheesecake sit inside for an hour. This gentle cool-down helps prevent sudden temperature shock (because cheesecakes are a little… delicate).
After an hour, transfer it to the counter and cool completely. Then cover and chill in the fridge for at least 6 hours, but overnight is even better. Good things come to those who wait.
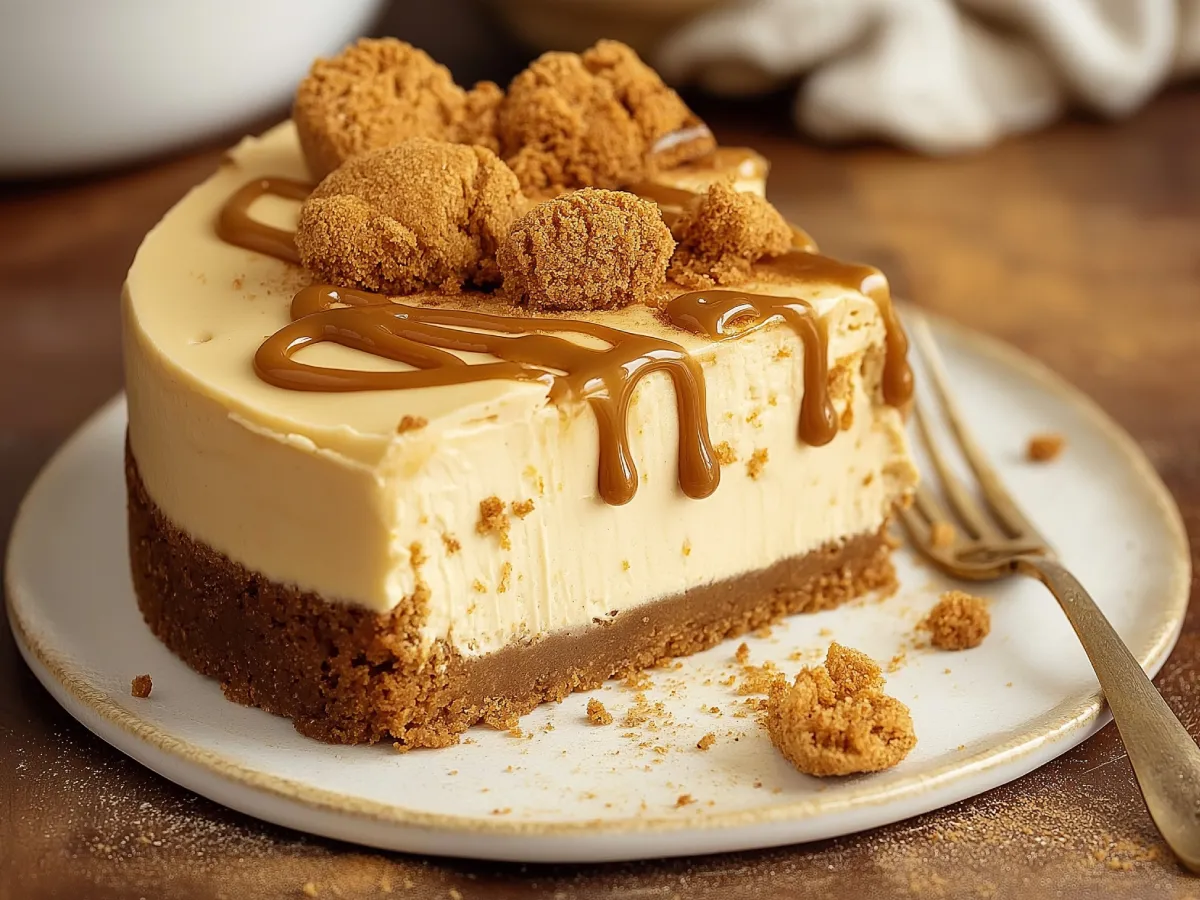
Step 6: Add the Sweet Finishing Touch
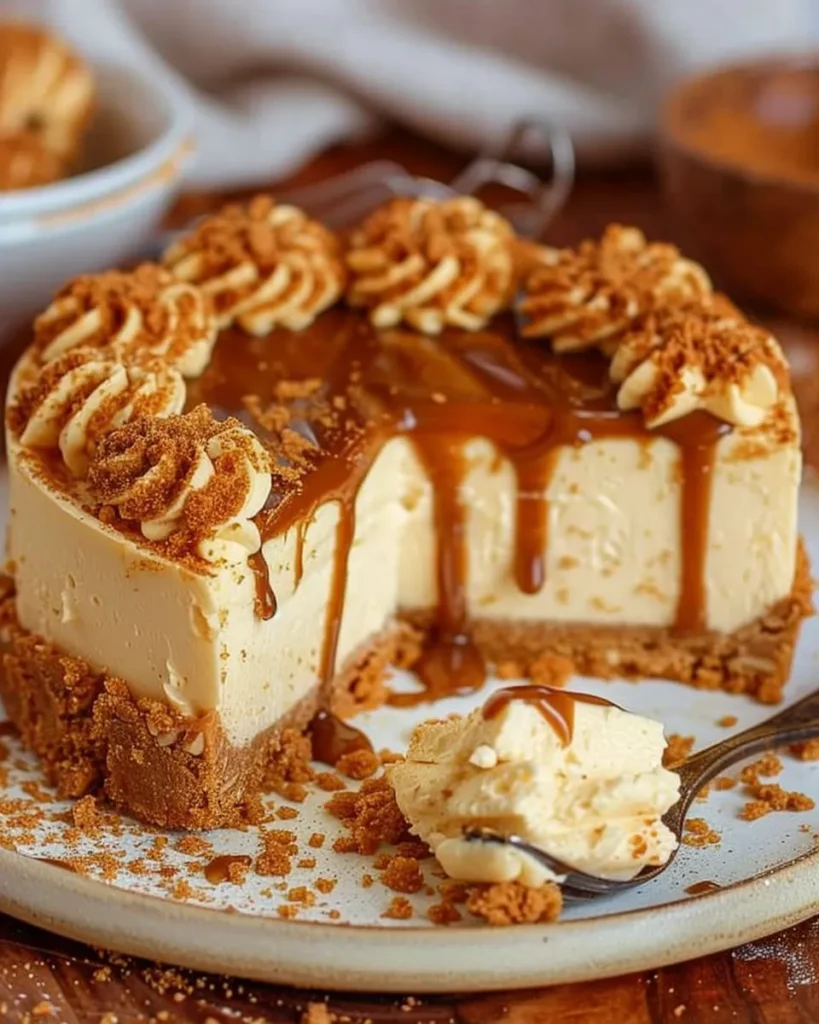
Before serving, warm your Biscoff spread just enough so it’s pourable but not hot. Drizzle it over the top of your Biscoff Cheesecake in lovely swirls—or just pour it on thick. No judgment.
Sprinkle the crushed Biscoff cookies over the top for a final crunch. And there it is—your masterpiece!
Pro Tips from My (Crumb-Filled) Kitchen
- Room temp is key – cold ingredients won’t blend smoothly, and we want velvet here, not bumps.
- Water bath = lifesaver – yes, it’s an extra step, but it’s the difference between bakery-level cheesecake and a cracked science experiment.
- Chill time matters – don’t skip or skimp. The texture transforms after a good night’s rest in the fridge.
- No food processor? No problem. A zip bag and a rolling pin are therapeutic and effective.
A Little Biscoff Cheesecake Story…
I made this Biscoff Cheesecake for the first time on a rainy Sunday when the kids were bouncing off the walls, and I desperately needed something sweet (and silent). They were skeptical—“What’s Biscoff?”—but after one bite, they were hooked.
Now, it’s become our celebration cake. Birthdays? Cheesecake. Good report card? Cheesecake. Just made it through a Tuesday without chaos? Cheesecake.
And the best part? It’s the one dessert I don’t mind making again and again—because it always turns out great, and it always brings smiles. (Also, I get the first slice. Chef’s rights.)
How to Store Your Biscoff Cheesecake (If There’s Any Left…)
So, you managed to save a slice or two? First of all—impressive restraint!
Here’s how to keep your Biscoff Cheesecake fresh and fabulous:
In the Fridge:
Wrap your Biscoff Cheesecake (still in the pan or sliced) tightly with plastic wrap or place it in an airtight container. Store it in the refrigerator for up to 5 days. The flavor actually deepens after a day or two, making those leftovers extra magical.
In the Freezer:
Want to save some for later? No problem! Wrap individual slices in plastic wrap, then again in foil, and place them in a freezer-safe bag. Freeze for up to 2 months.
Looking for another make-ahead wonder? These Best Gluten-Free Carrot Cake Cupcakes are freezer-friendly and crowd-approved.
To serve, just thaw in the fridge overnight. It tastes just as decadent—maybe even better, because you didn’t have to make it again.
Quick Tip: Avoid freezing with the topping—add that fresh after thawing for the best texture.
Nutrition Breakdown: What’s Inside This Slice of Sweetness?
Okay, let’s be real: this isn’t a salad. But if you’re going to indulge (and oh, you should), it’s nice to know what you’re working with. This Biscoff Cheesecake is rich, creamy, and made with real ingredients—no fake stuff, no weird preservatives, just good old-fashioned dessert love.
While this treat is definitely on the indulgent side, it also packs a little protein, some calcium, and a touch of iron from the cream cheese and eggs. And since it’s homemade, you control the quality of the ingredients.
Whether you savor a small slice or dive fork-first into a generous wedge (no judgment!), you’re getting a dessert that satisfies both your sweet tooth and your soul.
Here’s the breakdown for one slice (based on a 12-slice cheesecake):
| Nutrient | Amount per Serving |
|---|---|
| Serving Size | 1 slice (approx. 170g) |
| Calories | 525 |
| Total Fat | 36g |
| Saturated Fat | 18g |
| Unsaturated Fat | 14g |
| Trans Fat | 0.5g |
| Cholesterol | 135mg |
| Sodium | 300mg |
| Carbohydrates | 42g |
| Fiber | 1g |
| Sugar | 30g |
| Protein | 8g |
| Calcium | 12% DV |
| Iron | 6% DV |
| Potassium | 210mg |
| Vitamin A | 20% DV |
| Vitamin D | 6% DV |
Note: These values are approximate and can vary depending on your specific ingredients.
Let’s Talk Time: How Long Does Biscoff Cheesecake Take?
Okay, we’re not going to sugarcoat it—this isn’t a 30-minute dessert. But oh honey, it’s so worth the wait. Think of this as your “make-ahead magic” dessert. It’s perfect for prepping the night before a birthday, brunch, or “just because it’s Tuesday” celebration.
Here’s how the time breaks down:
- Prep Time: 25 minutes
(That includes crushing cookies, whipping up the batter, and sneaking a few spoonfuls. Totally part of the process.) - Cook Time: 70 minutes
(Your oven handles this while you scroll, sip coffee, or catch up on your shows.) - Cooling Time (in oven + countertop): 2 hours
(Slow and steady keeps your Biscoff Cheesecake from cracking—trust the process.) - Chilling Time (fridge): 6 hours minimum
(Overnight is ideal. The flavors mingle, the texture sets, and it all becomes sliceable perfection.) - Total Time: Around 9 hours
(Yes, it’s a long game, but most of that time? Hands off. Your fridge is doing the hard work.)
Yield & Cuisine
- Yield: 12 generous slices (or 16 smaller ones if you’re sharing with extra friends—or kids who think they want a “small piece”)
- Cuisine: American with a European twist
(Thanks to those irresistibly spiced Biscoff cookies from Belgium—it’s an international dessert dream.)
Whether it’s a weekend treat or a midweek pick-me-up, this Biscoff Cheesecake has a way of making everything feel just a little more special. It’s the kind of dessert that doesn’t just satisfy your sweet tooth—it brings a moment of calm, a little indulgence, and a whole lot of joy. So the next time life gets messy (hello, peanut butter hair moments), remember you’ve got a creamy, spiced, cookie-laced slice of comfort just a few steps away. Go ahead—make it, share it, and savor every bite. You’ve earned it.
Frequently Asked Questions About Biscoff Cheesecake
Sure! While Biscoff cookie butter brings that signature spiced caramel flavor, you can swap it with another cookie spread or even peanut butter in a pinch. Just know it’ll change the flavor profile a bit—but it’ll still be delicious.
What if I don’t have a springform pan?
You can use a deep pie dish or a regular cake pan lined with parchment. Just be sure to grease well and adjust your baking time slightly. A springform pan just makes serving this easy cheesecake recipe a little neater.
Is it possible to make this Biscoff Cheesecake without a water bath?
You can bake your Biscoff Cheesecake without a water bath, but you may notice some cracks on the top. If you’re okay with that (and planning to drizzle Biscoff spread on top anyway), go for it! The flavor will still be amazing.
Can I freeze the whole Biscoff Cheesecake?
Yes! Wrap the entire (cooled) cheesecake tightly in plastic wrap and foil, then freeze. When you’re ready to serve, thaw it overnight in the fridge. Just wait to add the topping until after thawing for the best texture.
How long can I store leftovers in the fridge?
Your Biscoff Cheesecake will stay fresh for up to 5 days when stored in an airtight container. In fact, the flavor gets even better after the first day—it’s the magic of a well-rested dessert!
