Let’s face it there are days when life feels like a balancing act between work deadlines, laundry piles, and trying to get a semi-decent dinner on the table. And somewhere in the mix, you might just need a little joy. Enter: ice cream cupcakes.
Now, don’t worry. These aren’t the kind of “cupcakes” that require a pastry degree or hours of kitchen gymnastics. These babies are made with flat-bottomed ice cream cones, a no-fuss batter, and a whipped-up cream cheese frosting that feels like a sweet little high-five after a long day. Perfect for birthday parties, after-school treats, or let’s be real just hiding in the pantry for a moment of peace with one in each hand.
What makes ice cream cupcakes so fabulous? For starters, they bake right in the cone. Translation: no cupcake liners, no mess, and definitely no extra dishes. They’re the ideal dessert when you’re short on time but want something cute, clever, and totally kid-approved (because yes, they will squeal with delight).
And hey, if you’ve got picky eaters, don’t fret. These ice cream cupcakes are customizable with sprinkles, chocolate, or even a fun frosting swirl that rivals anything from a bakery. Plus, they’re portable, portion-controlled, and let’s be honest downright adorable.
Whether you’re planning a bake sale or just need a pick-me-up treat that’s equal parts fun and flavor, this recipe will have you saying, “Why didn’t I make these sooner?”
Contents
- 1 Why You’ll Love These Ice Cream Cupcakes
- 2 🧁 What You’ll Need: Equipment
- 3 👩🍳 Step-by-Step: How to Make Ice Cream Cupcakes
- 4 🧂 Tips from the Kitchen Trenches
- 5 💬 A Sweet Little Story
- 6 🧊 How to Store Your Ice Cream Cupcakes (So They Stay Cute & Delicious)
- 7 🥄 Nutrition Information: What’s in These Sweet Treats?
- 8 ⏱️ Let’s Talk Time: Because Every Minute Counts
- 9 🎂 Yield: How Many Does It Make?
- 10 🌍 Cuisine: A Sweet American Classic
- 11 ❓ Frequently Asked Questions About Ice Cream Cupcakes
Why You’ll Love These Ice Cream Cupcakes
- They bake right inside the cones-less mess, more fun!
- Perfect for birthdays, parties, or “just because” dessert nights.
- Easy to make with ingredients you probably already have.
- Kids and adults both love the surprise cupcake twist.
- Frosting options galore to make them your own.
🧁 What You’ll Need: Equipment
Before we get whisking and baking, here’s a quick list of what you’ll need to bring these ice cream cupcakes to life:
- 12 flat-bottomed ice cream cones (yep, the edible kind!)
- A standard muffin or cupcake tin
- Mixing bowls (at least two: one for wet, one for dry ingredients)
- Hand mixer or stand mixer (or a whisk and strong arms!)
- Measuring cups and spoons
- Rubber spatula
- Ice cream scoop or spoon (for clean batter transfer)
- Piping bag and star tip (or a zip-top bag snipped at the end for frosting)
- Cooling rack
- Toothpick (for the ol’ doneness test)
👩🍳 Step-by-Step: How to Make Ice Cream Cupcakes
Let’s roll up those sleeves, channel our inner cupcake queens, and get to baking. These ice cream cupcakes are as fun to make as they are to eat.
1. Prep Like a Pro
Start by preheating your oven to 350°F (175°C). Trust me, getting that oven hot before you start mixing is a lifesaver when you’re juggling kids, Zoom calls, or both.
Grab your muffin tin and carefully place one flat-bottom cone in each cavity. They should sit upright like little soldiers ready for frosting glory. No need to grease the pan these cones aren’t going anywhere.
2. Mix the Wet Stuff
In a large bowl, toss in your softened butter and granulated sugar. Beat them together until it’s light and fluffy think soft-serve consistency. You can use a hand mixer or stand mixer, or go old-school with a whisk (and a quick arm workout).
Now add in the eggs, one at a time. Beat well after each, and toss in the vanilla extract like a flavor boss, For a fun twist, consider topping with a swirl of vanilla and chocolate frosting.
3. Get the Dry Stuff Ready
In a separate bowl, whisk together your all-purpose flour, baking powder, and salt. No need to sift unless you’re feeling fancy.
Now, grab that buttermilk. We’re going to alternate adding the dry ingredients and buttermilk into the butter mixture. Start and end with the dry stuff. Stir gently between additions until just combined no overmixing, or you’ll end up with tough ice cream cupcakes instead of tender bites of happiness.
4. Add Some Sparkle (Optional, but Fun!)
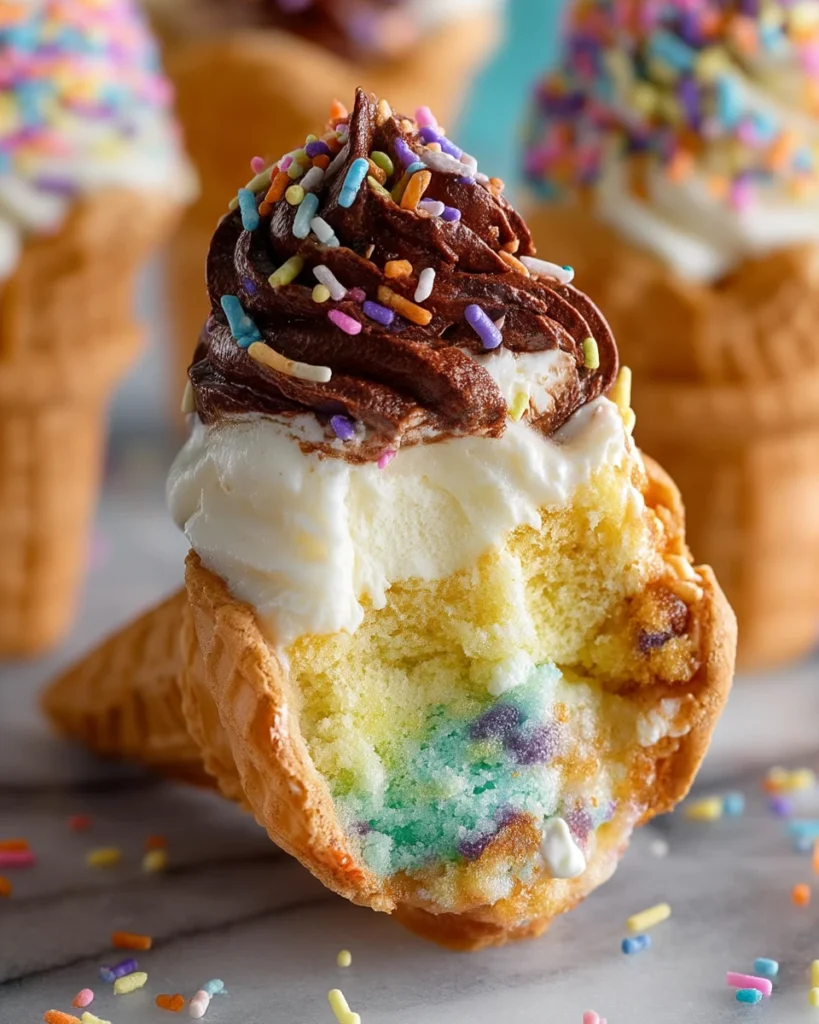
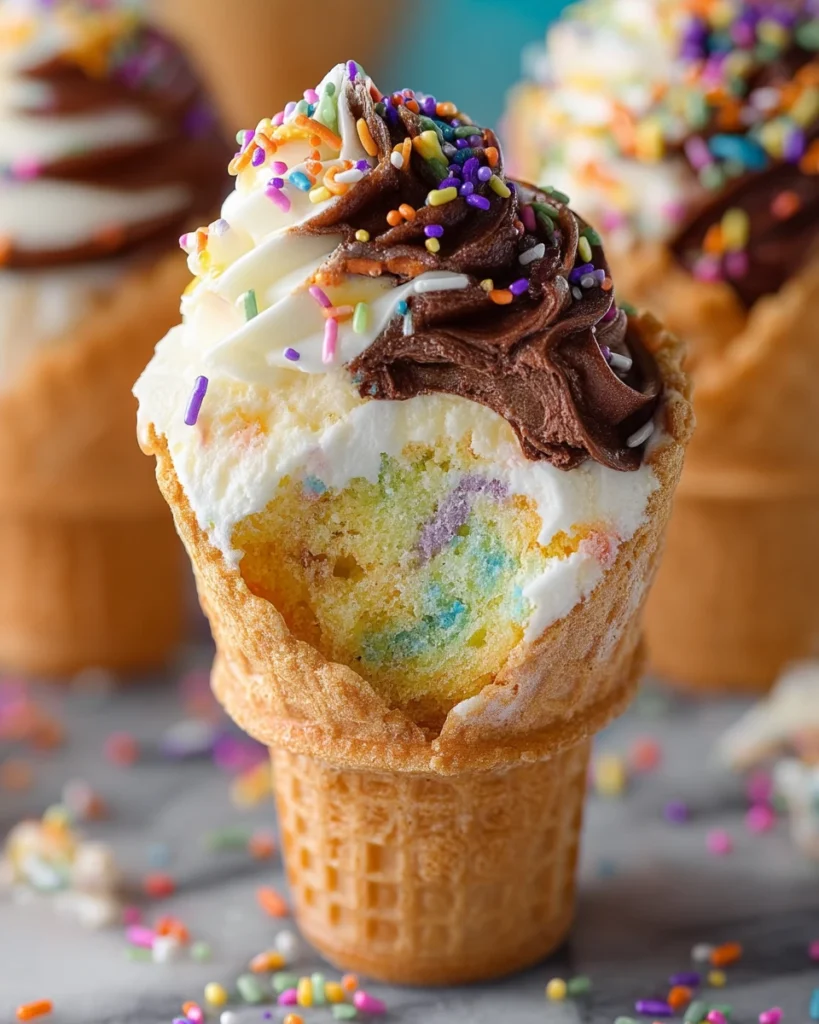
This is where the colored sprinkles or quinns come in. Gently fold in about 3 tablespoons if you’re going for a confetti cake vibe. Just skip the nonpareils they’ll bleed into the batter and turn everything a murky mess. We’ve all been there.
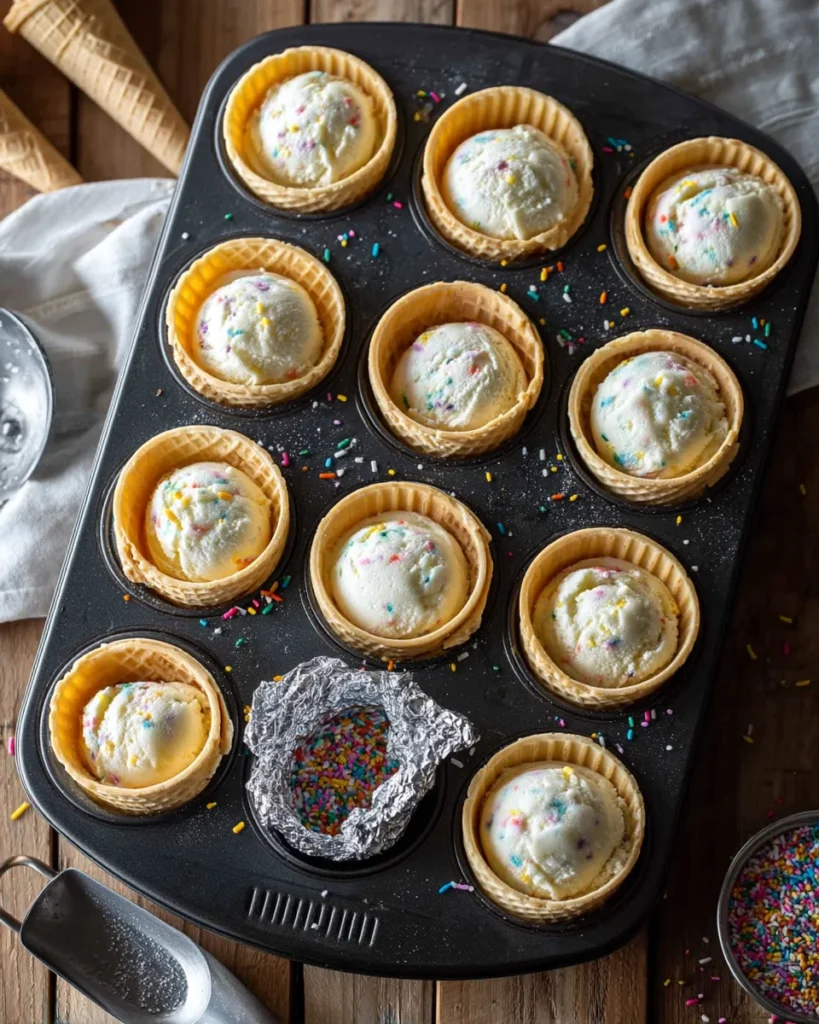
5. Scoop, Don’t Spill
Use an ice cream scoop or a spoon to fill each cone about ⅔ full. Don’t overdo it remember, this batter will rise, and we don’t want any cupcake volcanoes erupting in the oven.
Place the filled cones (still standing tall in your muffin tin) into the preheated oven.
6. Bake and Breathe
Bake for 18–22 minutes, but check around the 18-minute mark. Insert a toothpick into the center of a cupcake (right in the cone). If it comes out clean or with just a crumb or two, you’re good to go.
Let them cool in the pan for a few minutes, then carefully transfer the cones to a cooling rack. Yes, they’ll still be warm and adorable.
7. Whip Up That Frosting
In another large bowl, beat together softened butter and brick-style cream cheese. Keep mixing until the texture is dreamy smooth and creamy like your favorite soft scarf.
Toss in the salt and vanilla extract.
Now, gradually add in the powdered sugar and cocoa powder, mixing as you go. If things get too thick, add a tablespoon of heavy cream (or milk) at a time until it’s perfect for piping.
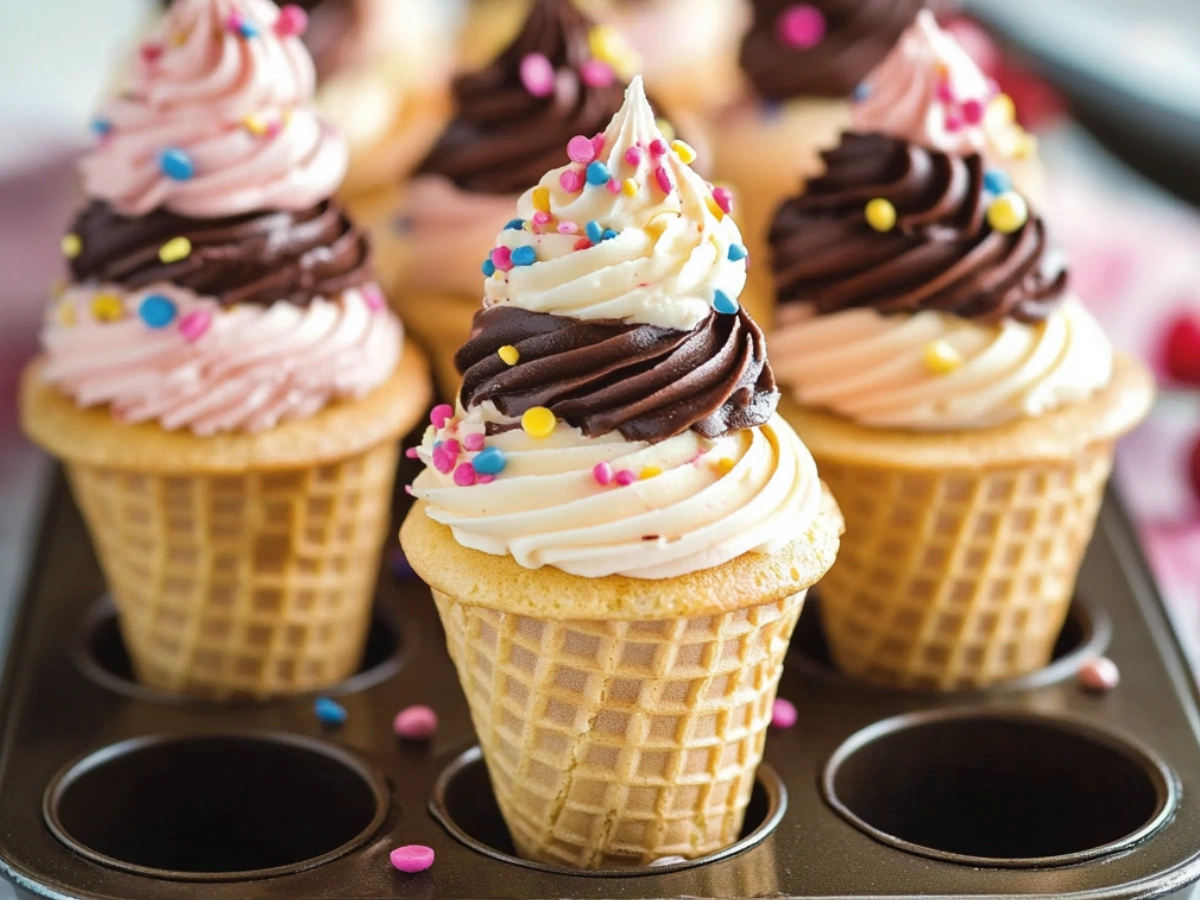
8. Frost Like a Rockstar
Once your ice cream cupcakes are completely cooled (and I mean completely, we don’t want the frosting to melt), spoon the frosting into a piping bag. Use a star tip for that classic soft-serve swirl.
Pipe a generous dollop on top of each cupcake cone. Add sprinkles for extra flair and maybe a cherry if you’re feeling retro.
9. Serve and Smile
These treats are best enjoyed fresh, but they can also be made a day ahead and stored in the fridge. Just bring them to room temp before serving for max flavor.
🧂 Tips from the Kitchen Trenches
- Don’t skip the cooling: Warm ice cream cupcakes and cream cheese frosting do not mix well unless you want frosting puddles.
- Stand your cones up straight: If your muffin tin doesn’t hold them snugly, crumple a bit of foil around the base of each cone to keep them upright.
- Customize it: Want chocolate batter instead? Swap out ¼ cup of flour for ¼ cup of unsweetened cocoa powder.
- Transport tip: Use a shallow box with foil lining and cut little holes for the cones no one wants a frosting massacre in the car.
💬 A Sweet Little Story
The first time I made these ice cream cupcakes was for my daughter’s classroom birthday party. Let’s just say they were a smash. I watched a group of sugar-charged eight-year-olds turn into cupcake critics debating over which frosting swirl was tallest. Ever since, it’s been our go-to for celebrations, sleepovers, and even Tuesday nights when the week’s been a little too long.
🧊 How to Store Your Ice Cream Cupcakes (So They Stay Cute & Delicious)
Once you’ve piped those dreamy frosting swirls and maybe even added a cherry on top, you might be wondering, how do I keep these beauties fresh without turning them into soggy cone disasters?
Short-Term Storage (1–2 Days):
For best taste and texture, enjoy your ice cream cupcakes the same day. But if you’ve got leftovers (or you’re the planning-ahead type), gently place the frosted cones upright in an airtight container. Pop them in the fridge. A good hack? Use a clean egg carton or a baking dish lined with foil to keep the cones standing tall.
Before serving, let them sit at room temperature for about 15–20 minutes so the frosting softens and the flavors shine through.
Long-Term Storage (3–5 Days):
Technically, these can last up to 5 days in the fridge, but the cones will start to soften after day two. The ice cream cupcakes are still tasty, they just lose that satisfying crunch. To keep them a little crisper, wrap each cone gently in plastic wrap before refrigerating, then store in an upright container.
Freezing Tips:
Freezing is not recommended for frosted cones, the cones absorb moisture and get chewy fast. If you want to prep ahead, bake the ice cream cupcakes in the cones and freeze them unfrosted. Wrap each cone tightly in plastic wrap, then freeze in a container or zip-top bag for up to 1 month. Defrost in the fridge overnight and frost before serving.
🥄 Nutrition Information: What’s in These Sweet Treats?
Let’s be honest, these aren’t kale chips. But they are a cheerful, portion-controlled dessert that packs a whole lot of fun in every bite. Each ice cream cupcake gives you a happy dose of indulgence with just enough sweetness to satisfy without going overboard.
While they’re not “low calorie,” they offer a decent balance of carbs, fats, and even a touch of protein thanks to the eggs and cream cheese frosting. Moderation is the name of the game. And let’s be real: when it comes to a classroom party or a weekend treat, a little sprinkle-covered joy is worth every bite.
Here’s a detailed look at the estimated nutrition per cupcake (with frosting and sprinkles):
| Nutrition Facts (Per Cupcake) | Value |
|---|---|
| Serving Size | 1 cone cupcake |
| Calories | 315 kcal |
| Total Fat | 15 g |
| Saturated Fat | 8 g |
| Unsaturated Fat | 5.5 g |
| Trans Fat | 0 g |
| Cholesterol | 50 mg |
| Sodium | 160 mg |
| Total Carbohydrates | 40 g |
| Dietary Fiber | 0.6 g |
| Sugars | 28 g |
| Protein | 3.2 g |
| Calcium | 60 mg |
| Iron | 1.2 mg |
| Potassium | 105 mg |
| Vitamin A | 320 IU |
| Vitamin C | 0 mg |
Note: Nutritional values are approximate and based on standard ingredient brands and portions. Results may vary depending on variations like added toppings, frosting quantity, or cone type.
⏱️ Let’s Talk Time: Because Every Minute Counts
When you’re juggling a million things homework, work emails, or that mysterious pile of laundry that seems to multiply, it helps to know exactly how long a recipe will take from start to frosting-finish.
Here’s the scoop (pun intended!) on how much time you’ll need to make these ice cream cupcakes from start to sweet, sweet finish:
| Time Breakdown | Duration |
|---|---|
| Prep Time | 15 minutes |
| Cook Time | 20 minutes |
| Cooling Time | 30–40 minutes (let them cool fully before frosting) |
| Frosting + Decorating Time | 15 minutes |
| Total Time | About 1 hour 15 minutes |
Bonus Time Tips:
- If you’re baking with little helpers, factor in an extra 10–15 minutes for “fun interruptions.”
- You can prep the frosting ahead of time and store it in the fridge for up to 2 days—just give it a quick whip before using.
🎂 Yield: How Many Does It Make?
This recipe makes 12 adorable ice cream cone cupcakes—perfect for a classroom party, birthday bash, or just to brighten up an ordinary day.
Got a bigger crowd? The recipe scales easily—just double everything (including the joy).
🌍 Cuisine: A Sweet American Classic
These ice cream cupcakes may look fancy, but their roots are all-American. Think county fairs, birthday parties, and summertime nostalgia wrapped up in one crunchy cone. Classic U.S. dessert vibes with a modern, mom-approved twist.
And just like that, you’ve got a dozen perfectly frosted, joy-sparking ice cream cupcakes ready to light up any moment—big or small. Whether it’s a birthday bash, a classroom celebration, or a spontaneous Tuesday treat, these whimsical little cones deliver happiness with every bite.
What I love most is how they bring out that nostalgic, childlike glee—without requiring a bakery run or hours in the kitchen. They’re fun to make, even more fun to decorate, and let’s be real… watching someone bite into one for the first time? Pure gold.
So the next time you’re craving something sweet, charming, and delightfully different, give these ice cream cupcakes a whirl. Just one look at those frosting swirls, and you’ll know—you’ve found your new go-to dessert.
❓ Frequently Asked Questions About Ice Cream Cupcakes
Can I use boxed cake mix for these ice cream cupcakes?
Absolutely! If you’re short on time or energy (we’ve all been there), a boxed cake mix works just fine. Just follow the package instructions and bake as directed in the cones. The magic is in the frosting and the fun presentation.
What kind of ice cream cones should I use?
Stick with flat-bottomed cones—also known as cake cones. They sit nicely in a muffin tin and hold the cupcake batter perfectly. Avoid sugar cones or waffle cones—they’re not stable enough for baking.
Can I make ice cream cupcakes ahead of time?
Yes! Bake the ice cream cupcakes in the cones up to a day in advance. Store them in the fridge in an airtight container. Add the frosting the day you plan to serve them for the freshest look and taste.
Can I freeze ice cream cupcakes?
Kind of. You can freeze the unfrosted cupcake cones for up to a month. Wrap each one in plastic and store them in a container. Thaw in the fridge overnight, then frost fresh. Freezing frosted cones isn’t recommended—they’ll go soggy fast.
Can I make these ice cream cupcakes gluten-free or dairy-free?
You sure can! Use your favorite gluten-free flour blend (look for a 1:1 baking mix) and swap in plant-based butter, cream cheese, and milk alternatives. Just keep in mind that texture might vary slightly, but they’ll still be delicious.
My cones got soft—what happened?
It happens! If stored too long or exposed to moisture, cones lose their crunch. Try wrapping them individually in plastic wrap before refrigerating next time to help preserve that crisp texture.
