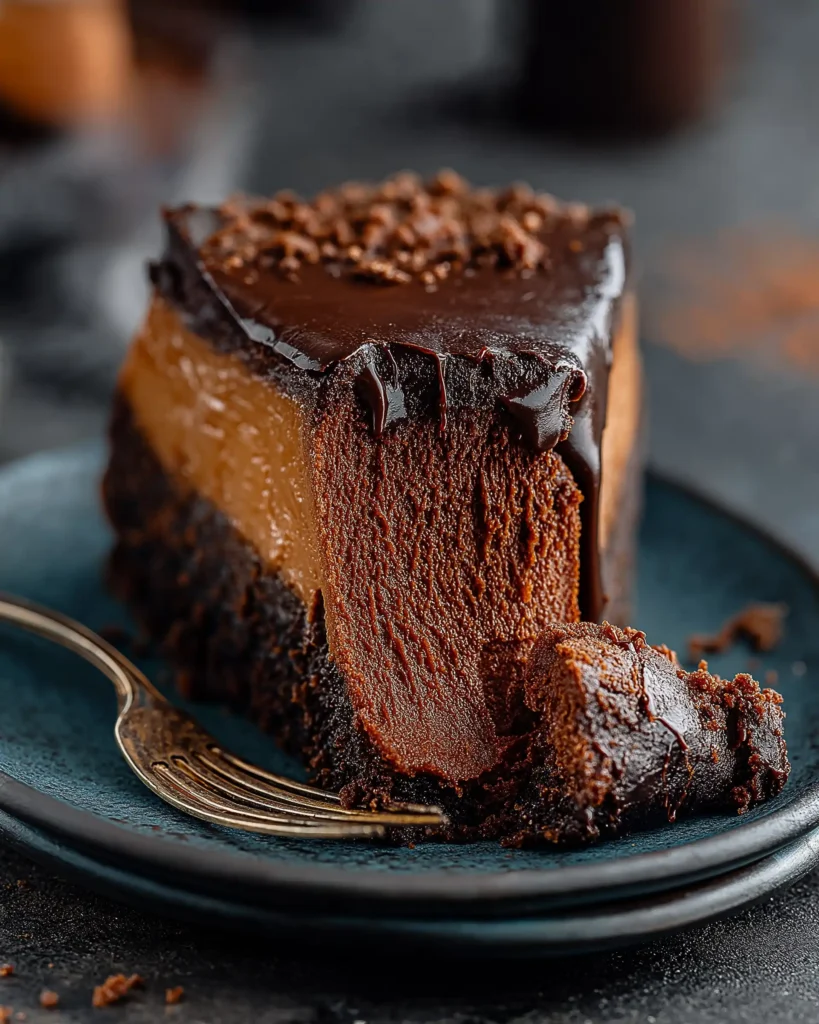
Let’s be honest—some days, all you really want is a slice of something rich, creamy, and chocolatey enough to hush a table full of picky eaters or to reward yourself after a long workday. This chocolate cheesecake is that slice. It’s not just dessert. It’s therapy, a celebration, and a crowd-pleaser all rolled into one glorious pan.
If you’re like most of us—juggling jobs, kids, dinner plans, and a million little to-dos—you probably don’t have time to fuss over complicated recipes with hard-to-find ingredients. That’s exactly why this recipe hits the sweet spot. It’s luxurious, yes, but it’s also incredibly doable. You’ll look like you spent all day in the kitchen when, really, you just had a good game plan (and a reliable stand mixer).
Think of this chocolate cheesecake as your culinary secret weapon. The kind of dessert that makes guests pause mid-bite and say, “Wait, you made this?” But it’s also the treat you make just for you—because you deserve a slice of decadence without a side of stress.
We’ll walk through every step, from building a chocolatey, buttery crust to whipping up a ganache so smooth it practically whispers sweet nothings. So grab your apron (or just a comfy hoodie) and let’s get baking.
Contents
- 1 Ingredients
- 2 Kitchen Tools You’ll Need
- 3 Step-by-Step: Making the Ultimate Chocolate Cheesecake
- 3.1 Step 1: Prep Like a Pro
- 3.2 Step 2: Build That Buttery Crust
- 3.3 Step 3: Melt the Chocolate (Without Losing Your Mind)
- 3.4 Step 4: Cream Cheese Dream Team
- 3.5 Step 5: Eggs + Yolks = Silky Perfection
- 3.6 Step 6: Fill It Up
- 3.7 Step 7: Bake with Love
- 3.8 Step 8: Chill (Both You and the Cake)
- 3.9 Step 9: Ganache Time, Baby
- 3.10 Step 10: Serve and Soak in the Compliments
- 4 Cooking Tips
- 5 Personal Anecdote
- 6 How to Store (or Freeze) Your Chocolate Cheesecake
- 7 Nutrition Info: What’s In Every Heavenly Slice
- 8 Let’s Talk Time: How Long Does This Chocolate Cheesecake Take?
- 9 Frequently Asked Questions
- 9.1 Can I use milk chocolate instead of bittersweet chocolate?
- 9.2 Can I make this chocolate cheesecake ahead of time?
- 9.3 How do I store leftover chocolate cheesecake?
- 9.4 Do I have to use a water bath?
- 9.5 Can I use low-fat cream cheese?
- 9.6 Is this chocolate cheesecake gluten-free?
- 9.7 Can I add toppings or mix-ins?
Ingredients
Let’s get one thing straight: this chocolate cheesecake isn’t here to play. Every ingredient has a job—to create the kind of rich, velvety bite that makes silence fall over a dinner table. So here’s what you’ll need to whip up this showstopper, plus a few tips if you’re short on something.
For the Chocolate Cookie Crust:
- 1 and 1/2 cups (180g) chocolate wafer crumbs – Think crunchy, chocolatey magic as the base layer. If you can’t find wafers, crushed chocolate graham crackers or even Oreos (minus the filling) work beautifully.
- 1/4 cup (57g) unsalted butter, melted – This binds your crust like a buttery glue. Salted butter can work too, just skip any extra salt in the recipe.
For the Creamy Chocolate Cheesecake Filling:
- 2 cups (340g) bittersweet chocolate, chopped – The deeper the cocoa, the richer the flavor. Go for 60-70% cacao for that adult-level indulgence.
- 1 and 1/2 pounds (680g) full-fat cream cheese, at room temp – Soft cream cheese blends better and avoids lumps. And yes, go full-fat. This is chocolate cheesecake, not diet food.
- 1 cup (198g) granulated sugar – Sweetens the deal without overpowering the chocolate.
- 1/4 cup (53g) packed light brown sugar – Adds a molasses-y depth that white sugar alone just can’t bring.
- 3 tablespoons unsweetened cocoa powder – Choose natural cocoa for a classic chocolate punch.
- 4 large eggs + 2 extra yolks, at room temperature – They’re the secret to that custard-smooth texture. Extra yolks = extra richness.
- 3/4 cup (170g) heavy cream – Adds silkiness to every bite.
- 1 teaspoon vanilla extract – Just enough to round out the chocolate with a warm, familiar note.
For the Glossy Chocolate Ganache Topping:
- 1 and 1/3 cups (226g) finely chopped semi-sweet chocolate – This creates that glossy, swoon-worthy top layer.
- 1 and 1/4 cups (12 ounces) heavy cream – Because more cream = more dreamy.
- 1/4 cup (57g) unsalted butter, cubed and room temp – This finishes the ganache with a shiny, luxurious finish. Think bakery window vibes.
Kitchen Tools You’ll Need
Before we melt, mix, and whip our way into dessert bliss, make sure you’ve got the right tools at your side. Here’s what you’ll need to create the ultimate chocolate cheesecake without breaking a sweat:
- 9-inch springform pan (because nobody likes a stuck cheesecake)
- Two large bowls — one for mixing the crust, the other for preparing the filling.
- Hand mixer or stand mixer — use it with the paddle attachment to make mixing effortless.
- Flexible silicone spatula — perfect for scraping out every delicious bit without wasting a drop!
- Measuring cups and spoons
- Saucepan (for that dreamy ganache)
- Whisk
- Baking sheet (for a water bath or just extra stability)
- Heavy-duty foil — perfect for sealing the pan tightly and keeping water from leaking in during baking.
- Cooling rack
Got everything? Apron on? Let’s make some magic.
Step-by-Step: Making the Ultimate Chocolate Cheesecake
Step 1: Prep Like a Pro
Preheat your oven to 325°F (163°C). Wrap the base and edges of your springform pan with foil to keep it nice and secure. This helps keep things leak-free if you’re using a water bath. If you’re not into water baths (understandable), the foil also gives extra structure.
Lightly coat the inside of the pan with non-stick spray — it’s a simple way to avoid any sticking surprises.
Step 2: Build That Buttery Crust
In a medium bowl, combine 1 and 1/2 cups of chocolate cookie crumbs with 1/4 cup of melted butter, stirring until the texture feels like damp sand. It should clump when pressed, kind of like beach sand right before a sandcastle masterpiece.
Press the mixture firmly into the bottom of your pan using your fingers or the bottom of a measuring cup. Chill it in the fridge while we work on the filling—this gives it a nice firm base.
Step 3: Melt the Chocolate (Without Losing Your Mind)
Put 2 cups of chopped bittersweet chocolate into a bowl that can handle heat. Melt it gently using a double boiler if you’re feeling fancy, or go the easy route and microwave it in 20-second intervals, stirring each time. Let it cool a bit — it should be silky, not steaming.
Step 4: Cream Cheese Dream Team
In a large bowl, beat 1 and 1/2 pounds of cream cheese until it’s creamy and lump-free. Don’t rush this—soft cream cheese is your BFF here. Then, add 1 cup granulated sugar, 1/4 cup light brown sugar, and 3 tablespoons cocoa powder. Keep beating until it’s smooth as silk.
Scrape the bowl. Always scrape the bowl.
Step 5: Eggs + Yolks = Silky Perfection
Add 4 eggs and 2 yolks, one at a time, mixing on low speed. Slow and steady keeps the batter from getting too airy. Overbeaten eggs = cracks in your chocolate cheesecake. No thank you.
Mix until everything’s combined, then stir in the 3/4 cup heavy cream and 1 teaspoon vanilla extract. Finally, fold in that glorious melted chocolate.
Step 6: Fill It Up
Transfer the filling into the crust, spreading it out evenly with a spatula. Lightly tap the pan on the counter to pop any hidden air bubbles.
Step 7: Bake with Love
Place the chocolate cheesecake pan on a large baking sheet. If you’re going the water bath route, fill the baking sheet with hot water about halfway up the side of the pan. Bake for 55–65 minutes, or until the center is just slightly jiggly—like set Jell-O, not soup.
Turn off the oven and crack the door open. Let the chocolate cheesecake cool inside for about an hour. This helps it settle gently and reduces the risk of those dreaded cracks.
Step 8: Chill (Both You and the Cake)
Transfer the chocolate cheesecake to a cooling rack. Once it’s room temp, cover it loosely with foil and chill for at least 6 hours—overnight is even better. You want it cold and firm before adding the ganache.
Step 9: Ganache Time, Baby
Place 1 and 1/3 cups semi-sweet chocolate in a heatproof bowl. In a saucepan, heat 1 and 1/4 cups heavy cream until it’s just about to boil. Pour it over the chocolate and let it sit for a minute, then stir until smooth.
Add in 1/4 cup butter, stir until melted and glossy. This is your crowning glory.
Pour the ganache over your chilled cheesecake and tilt the pan slightly to help it spread. Set it in the fridge for at least 25 to 35 minutes.
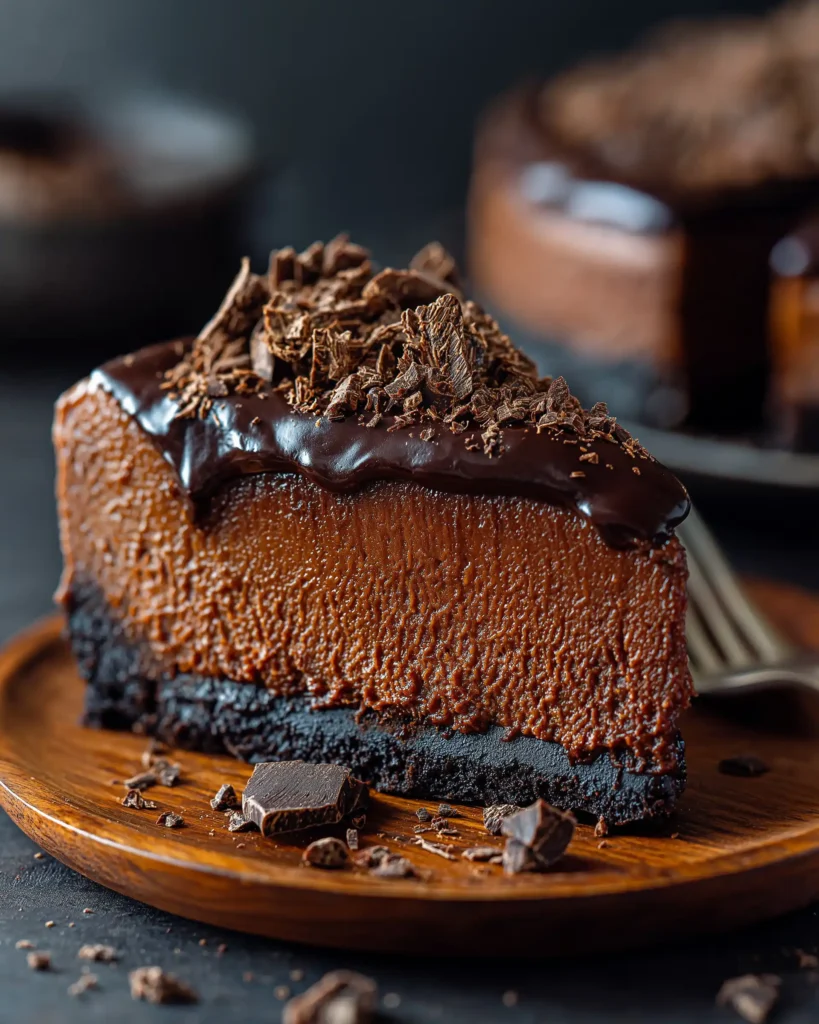
Step 10: Serve and Soak in the Compliments
When you’re ready to serve, run a warm knife around the sides to gently separate the cheesecake from the pan, then lift off the springform ring. For clean, sharp slices, use a sharp knife and wipe it after each cut. Now it’s time to proudly share your masterpiece!
Cooking Tips
- Room temp ingredients are non-negotiable: Cold cream cheese is the enemy of smooth batter. Let everything hang out on the counter while you preheat.
- No water bath? No problem: If you skip it, just keep an eye on the oven and avoid sudden temperature changes to minimize cracking.
- Don’t panic over a crack: That’s what ganache is for. It’s the edible concealer of the dessert world.
- Slice smart: Use a sharp knife, and wipe it clean between slices. Warm it under hot water for extra clean cuts.
Personal Anecdote
One Thanksgiving, I decided to switch things up and bring this chocolate cheesecake instead of the usual pumpkin pie. At first, everyone was a bit unsure—my kids looked doubtful, and my sister-in-law wasn’t convinced. But after the first taste? Not a word—just smiles and empty plates. Now, it’s the dessert everyone looks for first at every holiday and potluck.
How to Store (or Freeze) Your Chocolate Cheesecake
As wonderful as it is to enjoy a rich slice of chocolate cheesecake, nothing beats the feeling of knowing there’s more waiting for you in the fridge when you need a sweet pick-me-up. Thankfully, this dessert stores like a dream—and even freezes beautifully.
Short-Term Storage (Fridge):
After your chocolate cheesecake has fully cooled and the ganache is set, cover the pan loosely with plastic wrap or foil. You can refrigerate it for up to five days. To keep it looking perfect, leave it on the springform pan base and gently cover it with a cake dome or a large bowl turned upside down..
Want to keep slices extra fresh? Place individual portions in airtight containers. This is especially handy for quick grab-and-go treats or school lunches (because even moms deserve dessert on the run).
Long-Term Storage (Freezer):
Yes, you can freeze chocolate cheesecake—and yes, it still tastes incredible.
To freeze:
- Chill the chocolate cheesecake completely.
- Cut it into slices or keep it whole, then wrap it snugly in plastic wrap followed by a layer of foil.
- After that, tuck it into a freezer-safe bag or a sealed container.
You can freeze it for up to 2 months. When ready to indulge, thaw it overnight in the fridge. If serving to guests, unwrap it while still slightly frozen to avoid disturbing that luscious ganache topping.
Nutrition Info: What’s In Every Heavenly Slice
Indulgent? Yes. Worth it? Definitely! This chocolate cheesecake isn’t trying to pass as a healthy snack, but it still sneaks in a few good-for-you nutrients while serving up pure decadence. Want to go all out? Try the Cookie Dough Cheesecake—it’s the ultimate mashup of two classic favorites. You’ll get a boost of calcium and protein from the cream cheese, plus a dash of antioxidants and iron from the chocolate. But let’s be honest—this is a treat meant to be savored, not scrutinized.
Whether you’re tracking calories or just curious, here’s the breakdown of what you’re enjoying per standard slice (based on 12 servings):
| Nutrient | Amount Per Serving |
|---|---|
| Serving Size | 1 slice (1/12 of cake) |
| Calories | 590 kcal |
| Total Fat | 45g |
| Saturated Fat | 26g |
| Unsaturated Fat | 15g |
| Trans Fat | 0.5g |
| Cholesterol | 190mg |
| Sodium | 270mg |
| Total Carbohydrates | 38g |
| Dietary Fiber | 3g |
| Sugars | 30g |
| Protein | 8g |
| Calcium | 110mg (8% DV) |
| Iron | 3.2mg (18% DV) |
| Potassium | 210mg (6% DV) |
| Vitamin A | 950 IU (19% DV) |
| Vitamin D | 1.2µg (6% DV) |
| Magnesium | 35mg (9% DV) |
| Phosphorus | 160mg (13% DV) |
Note: Values are approximate and may vary based on brands used and slice size.
Let’s Talk Time: How Long Does This Chocolate Cheesecake Take?
Before you roll up your sleeves and dive in, let’s map out the timeline. While this isn’t one of those 30-minute miracles (we wish!), it’s definitely worth the wait. Just plan ahead a bit—most of the time is hands-off, which gives you plenty of breathing room to catch up on laundry, binge a show, or just sip some coffee in peace.
Here’s the full breakdown:
| Time Element | Duration |
|---|---|
| Prep Time | 30 minutes |
| Cook Time | 1 hour (55–65 minutes) |
| Cooling Time | 1 hour (in oven) |
| Chilling Time | 6 hours (or overnight) |
| Total Time | 8 hours 30 minutes |
Note: You can speed up the process slightly by chilling in the freezer (about 2–3 hours), but for best texture and flavor, the fridge is the way to go.
Yield
This cheesecake serves 12 generous slices, but if you’re feeding little ones (or holding back just a tad), you could stretch it to 14–16 smaller portions. Either way, it’s plenty for a family dessert, a small gathering, or even a “just because” treat that lasts a few days in the fridge.
Cuisine
This indulgent dessert falls squarely into the American cuisine category—with a bit of New York-style flair and rich chocolatey decadence that feels almost European. It’s the kind of cheesecake that belongs on any U.S. holiday table, potluck, or cozy weeknight dessert plate.
After all that stirring, melting, and (let’s be real) licking the spoon, you’ve just created a chocolate cheesecake that’s the stuff of dessert legends. Whether you serve it for a birthday bash, a quiet Friday night treat, or just because the week was long and your sweatpants are clean, this cheesecake is more than just a recipe—it’s a little act of joy.
You didn’t just bake a cake. You built layers of flavor, carved out time for yourself, and delivered pure chocolate bliss one bite at a time. And let’s not forget the real win: that ganache-covered masterpiece chilling in your fridge, ready to dazzle with zero effort tomorrow.
So the next time someone says, “You made this from scratch?”—just smile, nod, and maybe keep the secret of how simple it actually was. Because this chocolate cheesecake doesn’t just impress. It comforts, it celebrates, and it just might become your new go-to for every sweet moment life throws your way.
Absolutely! Here’s a naturally flowing, reader-friendly FAQs section with seamless use of your secondary keyword—chocolate cheesecake—keeping everything warm, clear, and helpful:
Frequently Asked Questions
Can I use milk chocolate instead of bittersweet chocolate?
You sure can! Just keep in mind that milk chocolate is sweeter and less intense than bittersweet chocolate, so your chocolate cheesecake will have a lighter flavor. If your sweet tooth leans that way, go for it!
Can I make this chocolate cheesecake ahead of time?
Absolutely. This dessert is actually better when made a day in advance. The flavors deepen overnight, and the texture becomes even silkier. Just cover it tightly and chill it until you’re ready to serve.
How do I store leftover chocolate cheesecake?
Store leftover slices in an airtight container in the fridge for up to 5 days. You can also freeze individual slices for up to 2 months—just thaw overnight in the fridge for best results.
Do I have to use a water bath?
Nope! While a water bath can help prevent cracks and create an extra creamy texture, this chocolate cheesecake still turns out beautifully without one. Just cool it gently in the oven after baking.
Can I use low-fat cream cheese?
Technically, yes—but fair warning: your cheesecake won’t be quite as rich or creamy. If you’re going to indulge, we say go all in with full-fat cream cheese for the dreamiest results.
Is this chocolate cheesecake gluten-free?
Only if you use gluten-free chocolate wafers for the crust. Everything else in the recipe is naturally gluten-free, so a quick swap at the base makes it suitable for gluten-sensitive guests.
Can I add toppings or mix-ins?
Of course! Crushed nuts, berries, or even a drizzle of caramel can take your chocolate cheesecake to the next level. Just keep the ganache in place—it’s the star of the show!