Let’s be honest—life gets a little wild sometimes. Between work meetings, carpools, and remembering who’s allergic to what at the next bake sale, you need recipes that work—and fast. That’s where these Minnie Mouse Cupcakes come to the rescue. They’re not just adorable—they’re ridiculously delicious, fun to make, and guaranteed to bring out smiles from the littlest party guests to the grown-ups “supervising” near the dessert table.
These Minnie Mouse Cupcakes are your secret weapon for birthdays, baby showers, Disney-themed parties, or even just those “because it’s Wednesday” moments. They’re not just adorable—they’re ridiculously delicious, You don’t need to be a baking wizard or spend hours in the kitchen—these cupcakes are surprisingly simple, yet look like they were crafted by a pro (seriously, prepare for compliments).
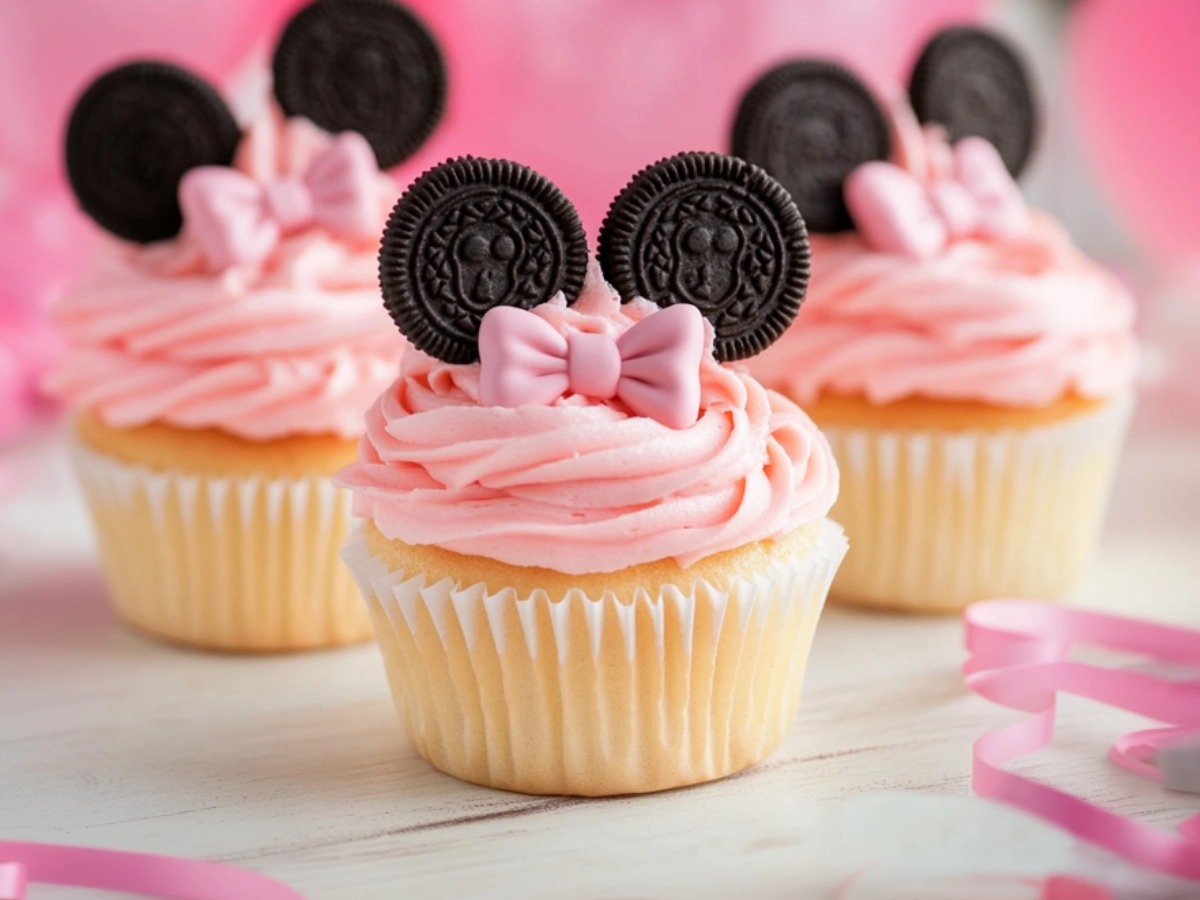
We’re talking moist, fluffy vanilla cupcakes with a creamy, dreamy frosting that’s just the right amount of sweet. Top it all off with mini Oreo ears and that signature pink frosting, and you’ve got yourself a treat even Minnie herself would approve of.
Whether you’re baking with the kids or need a quick crowd-pleaser for an event, this recipe is for you. So preheat that oven, throw on your polka-dot apron, and let’s whip up some Disney magic—without the stress.
Contents
- 1 Ingredients
- 2 Equipment You’ll Need
- 3 Let’s Bake Some Minnie Mouse Cupcakes!
- 4 Cooking Tips – Little Things That Make a Big Difference
- 5 A Sweet Little Story
- 6 Storage Tips – Keeping the Magic Fresh
- 7 Nutritional Information – Know Your Treat
- 8 Timing Is Everything – Here’s What to Expect
- 9 Frequently Asked Questions About Minnie Mouse Cupcakes
- 9.1 Can I substitute sour cream with something else?
- 9.2 Can I make Minnie Mouse Cupcakes ahead of time?
- 9.3 What if I can’t find mini Oreos for the ears?
- 9.4 Do these Minnie Mouse Cupcakes need to be refrigerated?
- 9.5 Can I freeze these Minnie Mouse Cupcakes?
- 9.6 Can I use this recipe for a Minnie Mouse cake instead?
Why You’ll Love These Minnie Mouse Cupcakes
- Adorable, Instagram-worthy design (hello, Minnie ears!)
- Simple ingredients you likely already have at home
- Perfect for birthdays, showers, or themed parties
- Kid-friendly and mom-approved
- Ready in under an hour
Ingredients
For the Minnie Mouse Cupcakes:
- 1 ½ cups cake flour
- 1 ½ cups all-purpose flour
- 1 ¾ cups sugar
- 2 ½ teaspoons baking powder
- 1 teaspoon salt
- 1 cup cold butter, cut into small cubes
- 4 large eggs
- 1 ½ cups sour cream or Greek yogurt
- 2 teaspoons vanilla bean paste
For the Frosting & Decorations:
- 1 cup (8 ounces) unsalted butter, softened
- 5 cups powdered sugar
- 1 teaspoon vanilla extract
- Pinch of salt
- 1–2 tablespoons half and half or heavy cream
- 2 drops pink food coloring (or 1 drop red)
- 48 mini Oreos
Equipment You’ll Need
Before we dive in and your kitchen starts smelling like a cupcake wonderland, let’s make sure you have all the tools ready:
- 12-cup muffin tin (or two, depending on batch size)
- Paper cupcake liners
- Mixing bowls – at least two, medium and large
- Electric hand mixer or stand mixer (because we’re not whipping all this by hand, no ma’am)
- Measuring cups and spoons
- Spatula or wooden spoon
- Cooling rack
- Piping bags with tips (star or round tip)
- Small offset spatula (optional, but makes frosting easier)
- Toothpick (for doneness test)
- Patience (only a little!)
Let’s Bake Some Minnie Mouse Cupcakes!
Step 1: Prep Like a Pro
Preheat your oven to 350°F (175°C) and line your cupcake tin with those cute paper liners. Go ahead and set out your butter so it’s softened by frosting time. If your eggs and sour cream are fridge-cold, bring them to room temp—they mix better and help your Minnie Mouse Cupcakes bake evenly.
Pro tip: Cold ingredients are to cupcakes what wet swimsuits are to car seats. Not ideal.
Step 2: Build The Batter Base
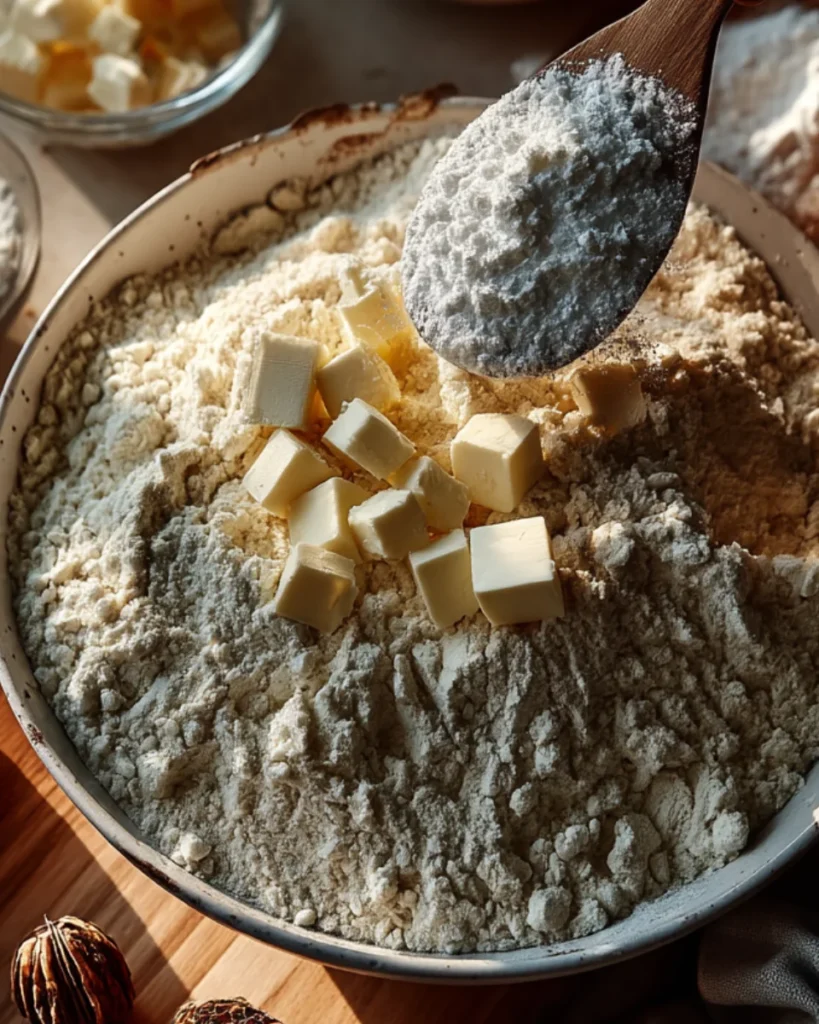
In a large bowl, whisk together the cake flour, all-purpose flour, sugar, baking powder, and salt. This is your dry mix foundation.
Now, grab your cold, cubed butter. Using your mixer on low speed, slowly add it to the dry mix. Don’t panic—it’ll look crumbly, almost sandy. That’s exactly what we want.
Step 3: Creamy Dreamy Mix-Ins
Crack those eggs in one at a time, mixing after each. You’ll see your batter transform from sandy to smooth—like magic! Scrape down the sides of the bowl so nothing’s left behind.
Then, blend in the sour cream (or Greek yogurt) and vanilla bean paste. Your batter should be creamy, pale, and smell like vanilla clouds.
Step 4: Fill and Bake
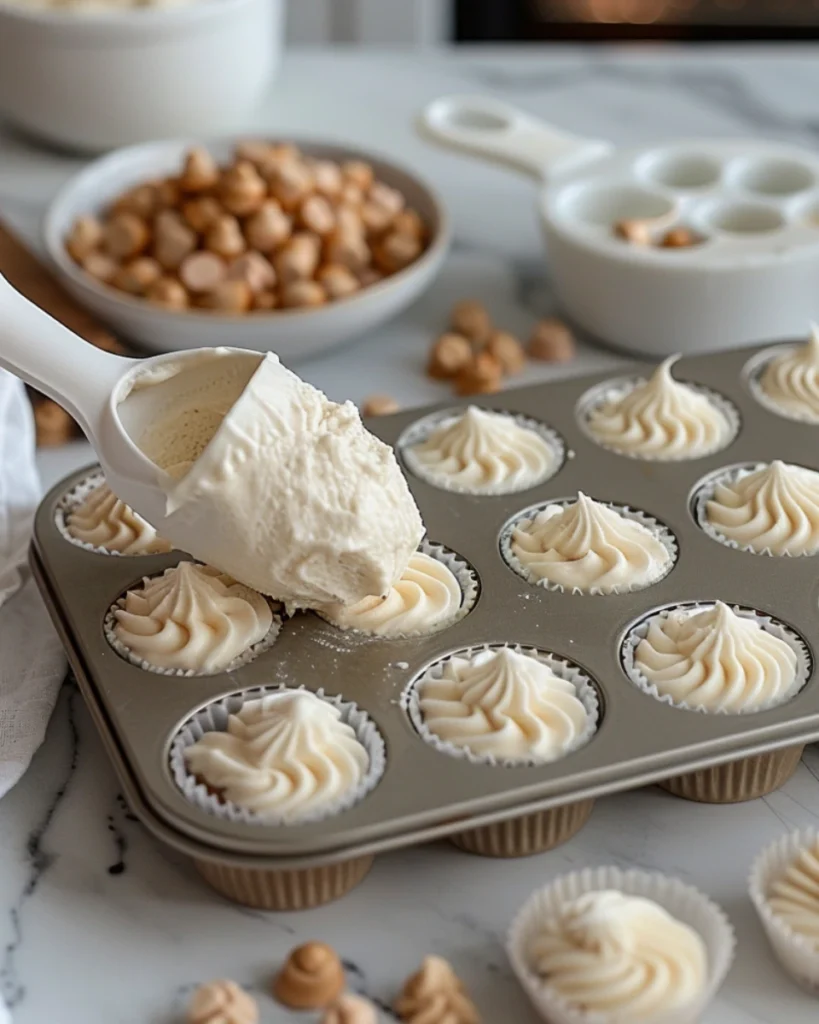
Using a scoop or spoon, fill each cupcake liner about two-thirds full. This leaves enough room for rising without muffin-top drama.
Slide the tin into your preheated oven and bake for 18–22 minutes. Your kitchen will smell like a sweet bakery by minute 10—brace yourself for hungry onlookers.
Check doneness with a toothpick. If it comes out clean (or with just a few crumbs), you’re good to go.
Let cupcakes cool in the tin for 5 minutes, then transfer to a wire rack. Let ‘em cool completely before frosting. Yes, this part is hard. Yes, it’s worth it.
Step 5: Frosting—Your New Superpower
In a clean bowl, beat the softened butter until it’s light and fluffy—about 3 minutes.
Gradually add powdered sugar, 1 cup at a time. This keeps your kitchen from becoming a sugar blizzard.
Once the sugar’s in, add vanilla, a pinch of salt, and the half and half or heavy cream—just a tablespoon or two to get that smooth, spreadable consistency.
Time for the fun part: Add the pink (or red) food coloring and beat until your frosting is gorgeously pink and fluffy.
Step 6: Assemble the Minnie Magic
Load your pink frosting into a piping bag and swirl a generous puff on each cooled cupcake.
Next, add two mini Oreos per cupcake—these are Minnie’s signature ears! Place them upright into the frosting like little chocolate ears peeking out.
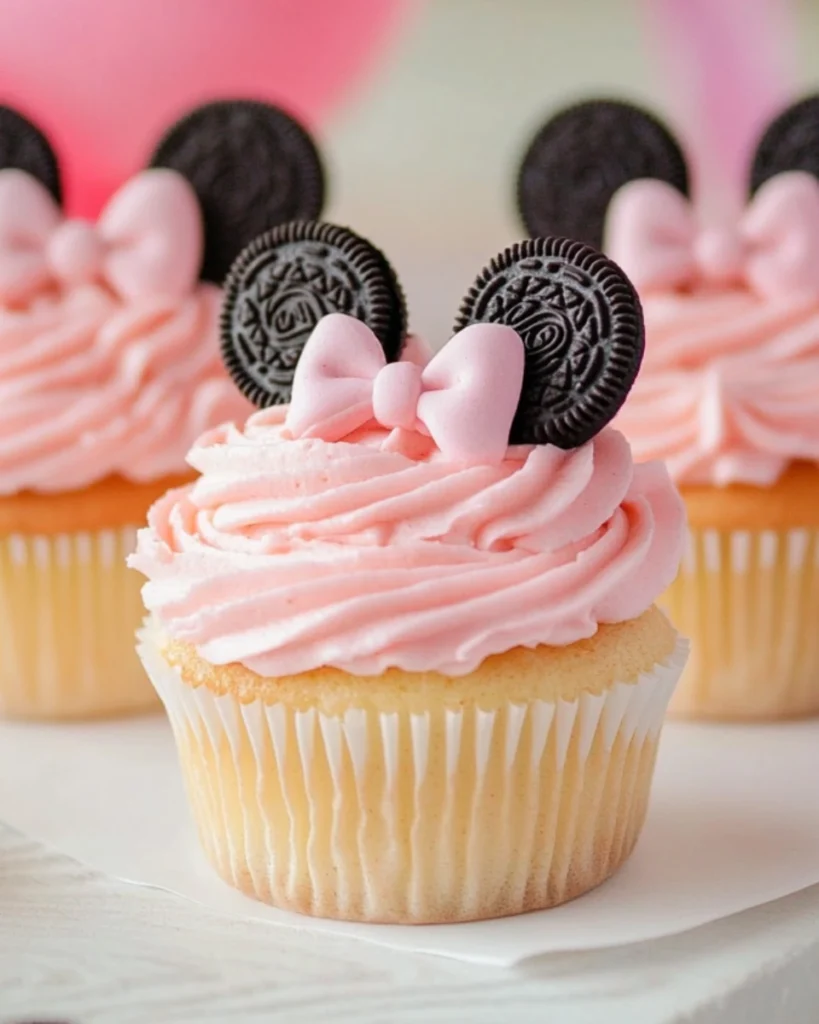
Want to go the extra mile? Pop on a fondant or sprinkle bow between the ears for full Minnie Mouse cupcake charm. (You can find these bows online or at baking stores—or skip it if time is tight. Nobody’s judging.)
Cooking Tips – Little Things That Make a Big Difference
- Room Temp = Happy Cupcakes: Cold eggs and dairy can mess with texture. Let them sit out while you prep.
- Don’t Overmix: Once your wet ingredients are in, mix just until combined. Overmixing leads to tough cupcakes (and nobody wants a dense Minnie).
- Test Before You Rest: Not sure if they’re done? The old toothpick trick is your bestie. If it’s clean, they’re ready.
- Go Easy on the Color: A tiny bit of food coloring goes a long way. Too much and your pink frosting turns neon drama.
- Can’t Find Mini Oreos? Slice regular ones in half—voilà, DIY mouse ears!
- Chill the Frosting if It’s Too Soft: Just 10–15 minutes in the fridge firms it up perfectly for piping.
And hey—if the Minnie Mouse Cupcakes don’t look Pinterest-perfect, just call them “abstract Minnie Mouse” and keep smiling.
A Sweet Little Story
The first time I made these Minnie Mouse Cupcakes, it was for my niece’s fourth birthday. I was short on time, the bows I ordered didn’t arrive, and half my Oreos mysteriously disappeared (thanks, kids). But you know what? Those imperfect little cupcakes were the hit of the party. The kids loved them, the moms asked for the recipe, and I realized—it’s not about perfection. It’s about fun, flavor, and those sweet moments we get to share.
Now, whenever a Disney-themed party pops up or I want to impress without the stress, this is my go-to. Because magic doesn’t need to be complicated—it just needs butter, sugar, and a touch of pink.
Storage Tips – Keeping the Magic Fresh
So, you’ve whipped up a batch of Minnie Mouse Cupcakes and maybe—just maybe—you have a few left (or you made extras for later, smart move). Here’s how to keep them fresh and fabulous:
Short-Term Storage (1–2 Days)
If you plan on enjoying these within a couple of days, just store them in an airtight container at room temperature. Keep them out of direct sunlight and away from heat—Minnie doesn’t do melting ears.
Pro tip: If your kitchen runs warm, consider keeping them in a cool pantry or even the fridge. Just bring them back to room temp before serving for that soft, moist texture.
Medium-Term Storage (3–5 Days)
Pop your Minnie Mouse Cupcakes (frosted or unfrosted) into an airtight container and refrigerate them. The fridge will help preserve their texture and flavor, especially the frosting.
- Before serving, let them sit on the counter for about 20–30 minutes. Cold cupcakes = stiff frosting, and no one wants that.
Long-Term Storage (Up to 2 Months)
Yes, these can be frozen! For best results:
- Freeze the Minnie Mouse Cupcakes without frosting. Wrap each one individually in plastic wrap.
- Place them in a freezer-safe zip-top bag or airtight container.
- When ready to serve, thaw at room temp, then frost fresh.
You can freeze frosted ones too—just freeze them uncovered for an hour, then transfer to a container. This prevents the frosting from smudging.
Nutritional Information – Know Your Treat
Sure, these Minnie Mouse Cupcakes are sweet and whimsical, but they also come with a nutritional story. Here’s what you’re getting in each one (and hey, knowledge is power—especially when you’re planning party portions or watching the sugar intake).
The values below are approximate per cupcake (including frosting and Oreo decorations), based on standard serving sizes. Always adjust for add-ons like bows or if you go heavy on the frosting (no judgment here!).
Why It Matters:
Each cupcake delivers a hearty dose of joy (and sugar). While they’re not exactly a protein shake, they do provide energy, calcium from the dairy, and a little iron. The key is balance—these are treats, not everyday fuel. Perfect for parties, celebrations, and bribing toddlers (kidding… mostly).
Nutrition Facts (Per Serving – 1 Cupcake)
| Nutrient | Amount |
|---|---|
| Serving Size | 1 cupcake |
| Calories | 355 kcal |
| Total Fat | 18 g |
| Saturated Fat | 10 g |
| Unsaturated Fat | 6 g |
| Trans Fat | 0.5 g |
| Cholesterol | 65 mg |
| Sodium | 190 mg |
| Total Carbohydrates | 45 g |
| Dietary Fiber | 1 g |
| Sugars | 32 g |
| Protein | 3.5 g |
| Calcium | 45 mg |
| Iron | 1.2 mg |
| Potassium | 90 mg |
| Vitamin A | 380 IU |
| Vitamin D | 0.8 mcg |
Timing Is Everything – Here’s What to Expect
When life is busy but you still want to bring a little Disney magic to the table, timing is key. Whether you’re prepping for a party or baking with little helpers, here’s how long your Minnie Mouse Cupcakes will take from start to finish:
| Time Breakdown | Duration |
|---|---|
| Prep Time | 25 minutes |
| Cook Time | 20 minutes |
| Cooling Time | 30 minutes |
| Decorating Time | 15 minutes |
| Total Time | 1 hour 30 minutes |
Note: If you’re freezing them for later or prepping bows/fondant decorations in advance, add a little extra buffer time for those bonus steps. But for a standard batch from bowl to bite—1.5 hours should do the trick!
Yield:
- Makes 24 standard-sized Minnie Mouse Cupcakes
- Perfect for one classroom party, two dozen delighted kids, or one very lucky birthday girl and her guests
Planning for a bigger crowd? This recipe scales up beautifully—just double everything and grab a second muffin tin.
Cuisine: American
These sweet treats blend classic American vanilla cupcake vibes with that unmistakable Disney charm. Whether you’re throwing a themed birthday bash or just making your Tuesday feel like a celebration, they’re full of joyful, all-American flavor.
And just like that, you’ve got a tray full of Minnie Mouse Cupcakes that are almost too cute to eat—but way too tasty not to. Whether you’re hosting a birthday party, adding a sprinkle of joy to a rainy afternoon, or just chasing that little spark of childhood magic, these Minnie Mouse Cupcakes bring it all home.
They’re sweet, simple, and packed with personality—kind of like Minnie herself. And while they might look like they came straight from a Disney bakery, only you’ll know how easy they really were to make (your secret’s safe with me!).
So go ahead, share them with friends, snap a photo before those Oreo ears disappear, and most importantly—enjoy every single bite. Because life’s too short for plain cupcakes… and honestly, who could resist a Minnie Mouse Cupcake?
Absolutely! Here’s your FAQs section, using the secondary keyword “Minnie Mouse Cupcakes” naturally, while keeping it fun, helpful, and reader-friendly 🧁✨
Frequently Asked Questions About Minnie Mouse Cupcakes
Can I substitute sour cream with something else?
Yep! If you don’t have sour cream on hand, Greek yogurt is a perfect swap in these Minnie Mouse Cupcakes. It keeps the texture moist and the flavor just as dreamy.
Can I make Minnie Mouse Cupcakes ahead of time?
Absolutely. Bake the Minnie Mouse Cupcakes a day in advance and store them (unfrosted) in an airtight container. Frost and decorate the day of serving for that fresh-from-the-oven feel.
What if I can’t find mini Oreos for the ears?
No problem! You can slice regular Oreos in half and gently press them into the frosting. It still gives that signature Minnie look with a DIY twist.
Do these Minnie Mouse Cupcakes need to be refrigerated?
If you’re keeping them for more than a day or if it’s warm in your kitchen, it’s best to refrigerate. Just bring the Minnie Mouse Cupcakes back to room temp before serving so the frosting softens up again.
Can I freeze these Minnie Mouse Cupcakes?
You bet. Freeze the unfrosted Minnie Mouse Cupcakes for up to 2 months. When ready, thaw at room temperature and decorate fresh. If you need to freeze them fully frosted, pop them in the freezer uncovered for an hour, then transfer to a container.
Can I use this recipe for a Minnie Mouse cake instead?
You can! The batter works beautifully in cake form—just adjust baking times and keep an eye on the center with a toothpick test.
Got more questions? Drop them in the comments—I’m always happy to help!
